Kansas State University

search

K-State Turf and Landscape Blog

Category: Horticulture e-newsletter

10 Rules for Planting Trees This Spring

By Brooke Garcia

This article was originally posted on March 18, 2021 on K-State Research and Extension News. For original article, please visit: Ten rules for planting trees this spring

Ten rules for planting trees this spring 

K-State horticulture expert shares tips to set you up for success

MANHATTAN, Kan. – If you’re planning to plant a tree in your yard this spring, there are some steps you can take to make sure your new landscape has its best chance of success.

Kansas State University horticulture expert Ward Upham shares the following ten rules for planting trees:

  1. Select the right tree for the site. To avoid serious problems, choose trees that are adapted to your location. Consider whether the tree produces nuisance fruit or if there are disease-resistant varieties available. For example, there are a number of crabapple varieties that are resistant to apple scab and rust diseases. Also consider the mature size of a tree to be sure you have enough room. Ask a local nurseryman for suggestions for trees adapted to your area.
  2. Keep the tree well watered and in a shady location until planting. When moving the tree, lift it by the root ball or pot and not by the trunk.
  3. Before planting, remove all wires, labels, cords or anything else tied to the plant. If left on, they may eventually girdle the branch to which they are attached. The root flare (point where trunk and roots meet) should be visible. If it isn’t, remove enough soil or media before planting so that it is.
  4. Dig a proper hole. Make the hole deep enough so that the tree sits slightly above nursery level. Plant the tree on solid ground, not fill dirt. In other words, don’t dig the hole too deep and then add soil back to the hole before placing the tree. The width of the planting hole is very important. It should be three times the width of the root ball. Loosening the soil outside the hole so it is five times the diameter of the root ball will allow the tree to spread its roots faster. 
  5. Remove all containers from the root ball. Cut away plastic and peat pots; roll burlap and wire baskets back into the hole, cutting as much of the excess away as possible. If you can remove the wire basket without disturbing the root ball, do it. If roots have been circling around in the container, cut them and fluff them out so they do not continue growing so that they circle inside the hole and become girdling roots later in the life of the tree. 
  6. Backfill the hole with the same soil that was removed. Amendments such as peat moss likely do more harm than good. Make sure the soil that goes back is loosened – no clods or clumps. Add water as you fill to ensure good root to soil contact and prevent air pockets. There is no need to fertilize at planting. 
  7. Don’t cut back the branches of a tree after planting except those that are rubbing or damaged. The leaf buds release a hormone that encourages root growth. If the tree is cut back, the reduced number of leaf buds results in less hormone released and therefore fewer roots being formed. 
  8. Water the tree thoroughly and then once a week for the first season if there is insufficient rainfall. 
  9. Mulch around the tree. Mulch should be 2 to 4 inches deep and cover an area 2 to 3 times the diameter of the root ball. Mulching reduces competition from other plants, conserves moisture and keeps soil temperature closer to what the plants’ roots prefer.  
  10. Stake only when necessary. Trees will establish more quickly and grow faster if they are not staked. However, larger trees or those in windy locations may need to be staked the first year. Movement is necessary for the trunk to become strong. Staking should be designed to limit movement of the root ball rather than immobilize the trunk. 

Upham and his colleagues in K-State’s Department of Horticulture and Natural Resources produce a weekly Horticulture Newsletter with tips for maintaining gardens and home landscapes. The newsletter is available to view online or can be delivered by email each week.

Interested persons can also send their garden- and yard-related questions to Upham at wupham@ksu.edu, or contact your local K-State Research and Extension office.

Brown Patch on Tall Fescue

By: Ward Upham

(Article from June 30th, 2020 Horticulture e-Newsletter)

We have been receiving numerous reports of brown patch showing up on tall fescue. This disease is favored by warm night temperatures and extended periods of leaf wetness. If you go outside in the morning and the lawn is covered with dew and the temperature is in the high 60s or higher, it means that conditions are getting right for brown patch. The fungus is primarily a leaf pathogen and does not attack the roots. During severe outbreaks, the fungus may invade the lower leaf sheaths and crown and kill plants. But in most cases, the turfgrass can recover from brown patch. This recovery may take two to three weeks, depending on weather. To read more, visit the Horticulture e-Newsletter: https://hnr.k-state.edu/extension/info-center/newsletters/2020/June30_2020_26.pdf

Three Steps to Choosing Potting Media for Outdoor Use

By Dr. Cheryl Boyer

There are a lot of choices in the potting media aisle of your local garden center. If you don’t know what you’re looking for, it can be a confusing experience to read the label. Fortunately, there are three easy steps/considerations for screening the available choices down to one that works for your needs.

Step 1: What are you using it for?

It does make a difference whether you are planning to use media in a container or as a soil amendment in a raised vegetable bed or landscaping bed. Some materials are designed to hold water well while others are designed to drain well. What do you need for each of those situations?

  • Growing plants in containers: Generally, you want to use a peat-based soil-less substrate for this application. Do not use field soil. These products are engineered for success in season-long growth of annual plants in containers of reasonable size for consumer use (very large containers are a different discussion). Peat-based mixes almost always have a “starter charge” of fertilizer mixed in to get your plants growing, but you’ll need to supplement with fertilizer as the season progresses. Old potting media has likely lost its starter charge and may, in fact, become hydrophobic (repels water) over time. You’ll need to spend some time rewetting and mixing old potting media for a new season if you intend to re-use it.
  • Amending a landscape bed or raised bed: Products containing peat should not be the primary component but are acceptable in small quantities. Field soil mixed with compost and perhaps a coarse pine bark-size material is best in this situation. The objective is to enrich your existing soil with natural material that will break down over time and in the meantime provide nutrients and aeration for roots to grow well. Make sure to apply the material and mix/till it into a broad area and not just a single planting hole or your new plants may experience the “soup bowl effect” and succumb to rapid decline. Check with your local landscape contractor to get a large volume of soil delivered, perhaps even mixed with compost from a local municipal composting facility.

Step 2: Understanding Major, Minor, and Specialty Components

These materials are regionally sourced and often composted to reduce particle size. Some materials are manufactured for the purpose of being used in potting media and many more are by-products of other industries. They are all fine as components but look at the label to understand how much of each “ingredient” is mixed, by volume, into the product you’re purchasing. If that information isn’t on the bag, be wary of purchasing.

  • Major components: Bark (or “composted forest products”), peat (this might be defined by type of peat which often refers to the source material or the coarseness), soil (don’t pay for this unless it’s local/regional and advertised as a single-component soil amendment—not as a potting media), manure, sand. Other waste-product alternative materials such as coconut coir and wood fiber are also great to use, but they’re not seen as often in consumer-level products.
  • Minor components: Perlite (little white pellets–it’s for aeration, not fertilization), vermiculite (shiny heat-expanded rock pieces), rice hulls (also for aeration with an added bonus of weed control when applied to the tops of containers). These are the most common.
  • Specialty components: mycorrhizae (symbiotic fungal organism that, mixed in, can be very beneficial in a container system by expanding the root capacity to take up nutrients and water, it’s less effective in field soil where these organisms are already abundant), fungicide (some products are designed to address specific fungal growth issues).

A note about manure and compost: These are good organic materials; however, you must be careful that the source can guarantee the material that produced the manure (hay, pasture grass, etc.) was not treated with herbicide. Many herbicides used in pasture management have a very long half-life and can persist in your landscape beds, killing desired plants.

A note about organic products: While most media components are considered “natural” and are likely produced using organic practices, few will be labeled as organic simply due to the nature of the organic certification process. An organically labeled product is not inherently better than another, though if you’re looking for a bagged manure product, organic will ensure the absence of herbicide residue.

Step 3: Mixing and Managing

Knowing what you’re working with and what you’re trying to do with it will help you understand how to manage it in practical use. These materials may also listed on the ingredient list and it’s helpful to know what to expect.

  • Lime: One special challenge we have in Kansas is that we have a lot of limestone around, which raises the pH of our soil and our water. You may notice that many bagged products include lime or limestone as a fertilization amendment. This is because most soil-less media components are very low in pH, or acidic, and they’re trying to get the mix to be pH neutral (so that most nutrients are available for plant uptake). In Kansas, most of our soils are on the high pH, or alkaline, side. It is to our advantage to apply soil-less products that are low in pH because that will help to neutralize our native soil. We don’t need the added limestone, but it’s unlikely you’ll find a product that doesn’t have it mixed in. For sure, don’t add more!
  • Fertilizer: As mentioned earlier, most bagged products have a “starter charge” of fertilizer. You won’t need to add anything immediately, but within a few weeks you’ll need to apply a water-based fertilizer (immediately available to plants) and/or a long-term slow-release fertilizer product. These usually come rated for months of use. A short-term product (3-4 months) may sound like it will last all summer, but if it gets really hot outside the pellets may release early (if temperature is the mode of operation). Combining a shorter-term product with a longer term one (8-9 months) may cover your needs for a longer time.
  • Wetting agent: Some products, like peat, are harvested and packaged in a very dry state and may need help retaining water when ready for use. This will likely be pre-mixed, though if you can tell it’s very dry you may want to spread it in a wheelbarrow and mix in some water (and maybe your own re-wetting agent) until it’s consistent.
  • Watering: Containers will need to be monitored for water more frequently than landscape beds, but they all need to be checked. This will vary in every situation, so you’ll need to keep an eye on it until you understand how all of the components are functioning together.

Potting media products are remarkably similar once you get past the packaging. Read the ingredient label (just like in the grocery store), find what you need for your application, and then choose the product that best meets your needs and your budget. Choose on price only after you’ve leveled the playing field of similar products.

Got questions about an unusual component? Let me know—I love a good alternative material discussion. Here is my email: crboyer@ksu.edu

Orchardrass in Tall Fescue Lawns

By Ward Upham

(Linked from K-State Horticulture e-Newsletter)

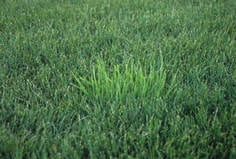
Orchardgrass often infests tall fescue lawns. Unfortunately, orchardgrass is lighter green and faster growing than tall fescue, so it is very visible. Homeowners complain of the light green tufts of grass wherever this weed has become established. To read more about this week, visit the website.


It’s beginning to look a lot like…. Christmas!

By Brooke Garcia

In the greenhouses at Kansas State University, I couldn’t help but notice the beautiful poinsettias growing. This isn’t the first place I have seen them around town, as garden centers and grocery stores are stocking up as well. However, the poinsettias currently at K-State are truly unique varieties. Who knew there were pink poinsettias? I had no idea!

The 1200 poinsettias featured in the K-State greenhouses are used for both research and teaching purposes. There are 37 students currently enrolled in Dr. Kimberly Williams’ Greenhouse Operations Management course, and they produce these poinsettias to learn more about managing plants in a greenhouse environment. The poinsettias featured below are just a few of my favorites: 

Christmas Traditions                                          Ferrara   


Golden Glo                                                    J’Adore Pink

Mars White                                               Premium Marble

Premium Picasso                                     XMas Beauty Marble

Many of these poinsettias will be included in the “Friends of the KSU Gardens Annual Poinsettia Sale” in the KSU Gardens Quinlan Visitor’s Center, located in Manhattan, KS. The dates for the sale are listed below:

  • Nov. 22, 2019: 12:00-5:30pm
  • Dec. 4th, 2019: 3:00-5:30pm
  • Dec. 6th, 2019: 11:30am-2:00pm

The poinsettias are in a 6.5 inch pot for $10.00 each. There will also be 10″ Centerpieces sold for $15.00. Cash or check only; no credit cards.

For more information about poinsettias, be sure to check out the two new articles on the Horticulture e-Newsletter blog. Link to the individual articles below:

Preparing for the Cold Season Ahead

By: Brooke Garcia

It seems as through Kansas only knows how to jump, skip, or hop into a new season. We had a small taste of Fall weather, and it is now feeling a lot more like winter. The landscape has most likely dramatically changed in the last few weeks. If you overseeded your lawn, you’re hopefully enjoying the green color of the freshly germinated seed. Several garden weeds are dying back. Mums are flowering and showing off their color. Maples, as well as other fall foliage, are showing off their beautiful fall color as well. Visit the Horticulture e-Newsletter for more information on some of the reasons these trees have color.

While some of our favorite landscape items are full of life and color, there are a handful of plants in the landscape that have entered dormancy or have died back. Not only have they lost their leaves or blooms, they may be ready for cutbacks. If you had annuals planted in the landscape, they may have recently died back from the recent freezing temperatures we experienced throughout Kansas. They will need to be removed from the landscape. Fall is an important time to perform a garden clean-up. For more specific information on perennial cutbacks, visit the Horticulture e-Newsletter for their recent post.

Want to know what to do with all of those leaves? Here is a previous blog post about Mow-mulching fall leaves.

It is also not too late to plant Spring-Flowering Bulbs. As long as the soil
temperatures >40 degrees Fahrenheit, the spring bulbs should continue to develop. For more information, read the article “There is Still Time to Plant Spring Flowering Bulbs” on the Horticulture e-Newsletter blog.

After you’ve completed cutbacks and bulb planting, mulching is an important task to be completed in the Fall. Not only does it “freshen” up landscape beds, it helps to retain soil moisture and protect the roots of plantings for the winter months ahead.

In addition to all of these Fall tasks, it is also important to consider general clean-up tasks that include:

  • Power-washing exterior of buildings and/or structures, as well as driveways or sidewalks
  • Container/planter re-fresh: Remove dead plantings from containers or planters. Empty used soil out of containers and store containers in a warmer/dry place. This can reduce cracking and general wear/tear.
  • Remove dead weeds from landscape
  • Remove fallen leaves/debris within landscape, and add to compost bin
  • Unscrew hose, and place hose-bib covers over hose bibs in preparation for freezing temperatures
  • Cover or store exterior furniture. Store cushions, umbrellas, etc.

This may seem like a lot of fall tasks to consider, but they are all important tasks to keep your landscape(s) looking beautiful during the fall and winter seasons. Hopefully this helps you develop your Fall clean-up program or builds onto an existing clean-up program for your landscape and garden.

Don’t forget to follow our Turfgrass Facebook Page for blog updates and other timely information.

Fall Turfgrass Recommendations and Tips

By Ward Upham

Fall Lawn Seeding Tips

The keys to successful lawn seeding are proper rates, even dispersal, good seed to soil contact, and proper watering. Evenness is best achieved by carefully calibrating the seeder or by adjusting the seeder to a low setting and making several passes to ensure even distribution. Seeding a little on the heavy side with close overlapping is better than missing areas altogether, especially for the bunch-type tall fescue, which does not spread.   Multiple seeder passes in opposite directions should help avoid this problem.

A more serious error in seeding is using the improper rate. For tall fescue, aim for 6 to 8 pounds of seed per 1,000 square feet for new areas and about half as much for overseeding or seeding areas in the shade.

Kentucky bluegrass is much smaller seed so less is needed for establishment.  Use 2 to 3 pounds of seed per 1,000 square feet for a new lawn and half that for overseeding or shady areas.

Using too much seed results in a lawn more prone to disease and damage from stress. The best way to avoid such a mistake is to determine the square footage of the yard first, and then calculate the amount of seed. Using too little seed can also be detrimental and result in clumpy turf that is not as visually pleasing.

Establishing good seed to soil contact is essential for good germination rates. Slit seeders achieve good contact at the time of seeding by dropping seed directly behind the blade that slices a furrow into the soil. Packing wheels then follow to close the furrow. The same result can be accomplished by using a verticut before broadcasting the seed, and then verticutting a second time.

Core aerators can also be used to seed grass. Go over an area at least three times in different directions, and then broadcast the seed. Germination will occur in the aeration holes. Because those holes stay moister than a traditional seedbed, this method requires less watering.

If the soil that has been worked by a rototiller, firm the soil with a roller or lawn tractor and  use light hand raking to mix the seed into the soil. A leaf rake often works better than a garden rake because it mixes seed more shallowly.

Water newly planted areas lightly, but often. Keep soil constantly moist but not waterlogged.  During hot days, a new lawn may need to be watered three times a day. If watered less, germination will be slowed. Cool, calm days may require watering only every couple of days. As the grass plants come up, gradually decrease watering to once a week if there is no rain. Let the plants tell you when to water. If you can push the blades down and they don’t spring back up quickly, the lawn needs water. Once seed sprouts, try to minimize traffic (foot, mower, dog, etc.) seeded areas receive until the seedlings are a little more robust and ready to be mowed. Begin mowing once seedlings reach 3 to 4 inches tall.

Overseeding a Lawn

Tall fescue lawns that have become thin over the summer can be thickened up by overseeding during September. Start by mowing the grass short (1 to 1.5 inches) and removing the clippings. This will make it easier to achieve good seed-soil contact and increase the amount of light that will reach the young seedlings.

Good seed-soil contact is vital if the overseeding is to be successful. Excess thatch can prevent seed from reaching the soil and germinating. Normally we want 1/4 inch of thatch or less when overseeding. If the thatch layer is 3/4 inch or more, it is usually easiest to use a sod cutter to remove it and start over with a new lawn. A power rake can be used to reduce a thatch layer that is less than 3/4 inch but more than a quarter inch.

Once thatch is under control, the soil should be prepared for the seed. This can be done in various ways.   For small spots, a hand rake can be used to roughen up the soil before the seed is applied,

A verticut machine has solid vertical blades that can be set to cut furrows in the soil. It is best to go two different directions with the machine. A slit seeder is a verticut machine with a seed hopper added so the soil prep and seeding operation are combined. Another option is to use a core aerator.

The core aerator will punch holes in the soil and deposit the soil cores on the surface of the ground. Each hole produces an excellent environment for seed germination and growth. Make three to four passes with the core aerator to ensure enough holes for the seed. Using a core aerator has the additional benefit of reducing the amount of watering needed to get the seed germinated and growing. Aeration also increases the water infiltration rate, decreases compaction, and increases the amount of oxygen in the soil.

Of the three methods, I prefer the slit seeder for obtaining good seed/soil contact.  However, if watering is difficult, core aeration may be a better option.  Regardless of method used, fertilizer should  be applied at the rate suggested by a soil test, or a starter fertilizer should be used at the rate suggested on the bag.

Give Cool-Season Grasses a Boost

September is almost here and that means it is prime time to fertilize your tall fescue or Kentucky bluegrass lawns. If you could only fertilize your cool-season grasses once per year, this would be the best time to do it.

These grasses are entering their fall growth cycle as days shorten and temperatures moderate (especially at night). Cool-season grasses naturally thicken up in the fall by tillering (forming new shoots at the base of existing plants) and, for bluegrass, spreading by underground stems called rhizomes. Consequently, September is the most important time to fertilize these grasses.

Apply 1 to 1.5 pounds of actual nitrogen per 1,000 square feet. The settings recommended on lawn fertilizer bags usually result in about 1 pound of nitrogen per 1,000 square feet. We recommend a quick-release source of nitrogen at this time. Most fertilizers sold in garden centers and department stores contain either quick-release nitrogen or a mixture of quick- and slow-release. Usually only lawn fertilizers recommended for summer use contain slow-release nitrogen. Any of the others should be quick-release.

The second most important fertilization of cool-season grasses also occurs during the fall. A November fertilizer application will help the grass green up earlier next spring and provide the nutrients needed until summer. It also should be quick-release applied at the rate of 1-pound actual nitrogen per 1,000 square feet.

Power Raking and Core-Aeration

September is the optimum time to power rake or core-aerate tall fescue and Kentucky bluegrass lawns. These grasses should be coming out of their summer doldrums and beginning to grow more vigorously. This is a good time to consider what we are trying to accomplish with these practices.

Power raking is primarily a thatch control operation. It can be excessively damaging to the turf if not done carefully. For lawns with one-half inch of thatch or less, I don’t recommend power raking but rather core aeration. For those who are unsure what thatch is, it is a springy layer of light-brown organic matter that resembles peat moss and is located above the soil but below the grass foliage. Power raking pulls up an incredible amount of material that then must be dealt with by composting or discarding.

Core-aeration is a much better practice for most lawns. By removing cores of soil, core-aeration relieves compaction, hastens thatch decomposition, and improves water, nutrient, and oxygen movement into the soil profile. This operation should be performed when the soil is just moist enough so that it crumbles easily when worked between the fingers. Enough passes should be made so that the holes are spaced about 2 to 3 inches apart. Ideally, the holes should penetrate 2.5 to 3 inches deep. The cores can be left on the lawn to fall apart naturally (a process that usually takes two or three weeks, depending on soil-type), or they can be broken up with a power rake set just low enough to nick the cores, and then dragged with a section of chain-link fence or a steel doormat. The intermingling of soil and thatch is beneficial to the lawn.

To view these posts in the Horticulture e-Newsletter, visit: http://www.ksuhortnewsletter.org/

Got Thatch?

By: Ward Upham

Thatch Control in Warm-Season Lawns

Thatch control for cool-season lawn grasses such as bluegrass and tall fescue is usually done in the fall but now is the time we should perform this operation for warm-season turfgrasses such as bermudagrass and zoysiagrass. Because these operations thin the lawn, they should be performed when the lawn is in the best position to recover. For warm-season grasses that time is June through July. Buffalograss, our other common warm-season grass, normally does not need to be dethatched.

When thatch is less than one-half inch thick, there is little cause for concern; on the contrary, it may provide some protection to the crown (growing point) of the turfgrass. However, when thatch exceeds one-half inch in thickness, the lawn may start to deteriorate. Thatch is best kept in check by power-raking and/or core-aerating. If thatch is more than 3/4 inch thick, the lawn should be power-raked. Set the blades just deep enough to pull out the thatch. The lawn can be severely damaged by power-raking too deeply. In some cases, it may be easier to use a sod cutter to remove the existing sod and start over with seed, sprigs or plugs.

If thatch is between one-half and a 3/4- inch, thick, core-aeration is a better choice. The soil-moisture level is important to do a good job of core-aerating. 
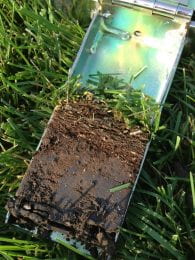
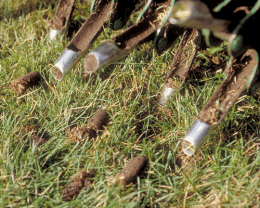
It should be neither too wet nor too dry, and the soil should crumble fairly easily when worked between your fingers. Go over the lawn enough times so that the aeration holes are about 2 inches apart.

Excessive thatch accumulation can be prevented by not over-fertilizing with nitrogen. Frequent, light watering also encourages thatch. Water only when needed, and attempt to wet the entire root zone of the turf with each irrigation.

Finally, where thatch is excessive, control should be viewed as a long-term, integrated process (i.e., to include proper mowing, watering, and fertilizing) rather than a one-shot cure. One power-raking or core-aeration will seldom solve the problem.

Following a Big Storm

Here are a couple of articles that should be helpful if you are
dealing with storm damage after a series of thunderstorms in our area. As we continue to face inclement weather throughout this week, please keep this information in mind. ***Articles have been provided by Warm Upham.

Storm Damage and the Garden

Various parts of the state have had high winds, excessive rainfall and
hail. This column deals with what can be done to help our gardens recover.

Heavy rain: The force of rainfall pounding on the soil can result in a
thick crust that prevents seed emergence and partially blocks oxygen
from reaching roots. A light scraping after the soil surface has dried
is all that is needed to correct these problems. Be careful of deep
tilling as it may damage young, tender roots.

Standing water: Standing water cuts off oxygen to the roots, which can result in plant damage if it doesn’t drain quickly enough. Most plants can withstand 24 hours of standing water without harm. Hot, sunny weather can make a bad situation worse by the water becoming hot enough to “cook” the plants. There isn’t much that can be done about this unless a channel can be cut to allow the water to drain.

Hail damage: Plants should recover quickly as long as the leaves only were damaged by the hail as leaves regenerate quickly. The situation becomes much more serious if the stems and fruit were damaged. The plant can recover from a few bruises but if it looks like the plants were mowed down by a weed whip, replanting is in order.

Leaning plants: Either wind or water can cause plants to lean. They
should start to straighten after a few days. Don’t try to bend them back as they often break easily. (Ward Upham)


Pruning Storm Damaged Trees 

Winter storms may cause serious tree damage. Often you will have to
decide whether a tree can be saved or not. Here is a checklist on care
of a storm-damaged landscape.

1. Be careful: Slippery ice and chainsaws don’t mix. Wait until all ice
has melted before beginning work. Check for downed power lines or
hanging branches. Don’t venture under the tree until it is safe. If
large limbs are hanging precariously, a certified arborist has the
tools, training and knowledge to do the work safely.

2. Cleanup: Remove debris so you don’t trip over it.

3. Decide whether it is feasible to save a tree. If the bark has been
split so the cambium is exposed or the main trunk split, the tree
probably will not survive and should be removed. If there are so many broken limbs that the tree’s form is destroyed, replacement is the best option.

Topping, where all the main branches are cut and there are only stubs left, is not a recommended pruning procedure. Though new branches will normally arise from the stubs, they are not as firmly attached as the original branches and more likely to break in subsequent storms. Also, the tree must use a lot of energy to develop new branches, leaving less to fight off diseases and insect attacks. Often, the topped tree’s life is shortened.

4. Prune broken branches to the next larger branch or to the trunk. If
cutting back to the trunk, do not cut flush with the trunk but rather at the collar area between the branch and the trunk. Cutting flush with the trunk leaves a much larger wound than cutting at the collar and takes longer to heal. Middle-aged or younger vigorous trees can have up to one-third of the crown removed and still make a surprisingly swift comeback.

5. Take large limbs off in stages. If you try to take off a large limb
in one cut, it will often break before the cut is finished and strip
bark from the tree. Instead, first make a cut about 15 inches from the trunk. Start from the bottom and cut one-third of the way up through the limb. Make the second cut from the top down but start 2 inches further away from the trunk than the first. The branch will break away as you make the second cut. The third cut, made at the collar area, removes the stub that is left.

*Note:* Pruning can be dangerous. Consider hiring a trained, certified arborist to do major work. Also, a good arborist knows how to prune trees so that storm breakage is less likely to occur. Preventing damage is better than trying to fix it once it has happened. The Arbor Day Foundation maintains an excellent Web site that contains detailed information. The URL is:
https://www.arborday.org/media/stormrecovery/4_treefirstaid.cfm  (Ward Upham)