(Editor’s note: This is Part 1 of a three-part series on the FreeMind software tool for creating “mind maps” of data.)
There are a number of open-source and freeware software tools that enable individuals or groups to brainstorm ideas in a spatialized way. This is useful for identifying concepts, interrelationships, and knowledge structures.
FreeMind is one tool that is easy to use, has a clear layout, and enables online interactivity (all its branches may be activated as HTML links).
Downloading FreeMind
First, go to the SourceForge wiki page to download this tool. The most current version of FreeMind is 0.9.0. It requires a Java Runtime Environment 1.4 or later. (A downloadable FreeMind reference manual is available for version 0.8.0.)
Download and save the executable file.
Using FreeMind
Once installed, go to the Start menu > Programs > FreeMind. Or, if you enabled the desktop icon, double-click it.
In the workspace, there will be a placeholder “New Mindmap” starting node. To edit the text, just left-click the node and change the text.
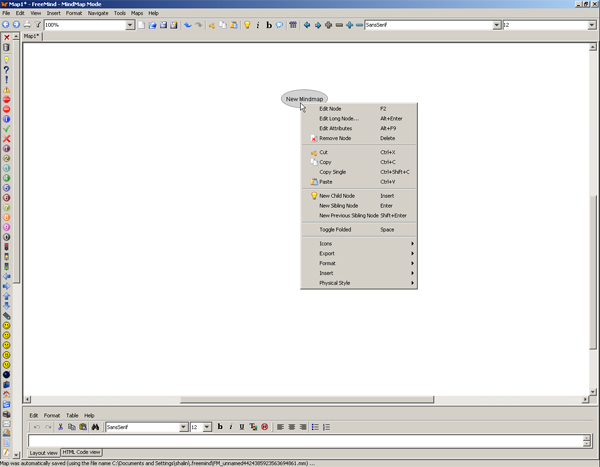
To start building a mind map manually, right-click the node. As shown in the image below, you’ll be able to edit that node in multiple ways — cut or copy it; create related nodes (“child” or “sibling” nodes); fold / temporarily hide the branches connected to that node; add visual icons; export that node and all its subordinated branches; insert an image; or format or edit its physical style.
To view the functions of the buttons at the top of the work space, just place your cursor over each button, and a small text box will appear next to the button with the defined function. In the work space, the insertable icons are arrayed down the left side.
Large, brainstormed mind maps may be created using this program, in part because of the ability to collapse branches. Furthermore, particular branches may be isolated out and made into their own mind maps for deeper development and insights. These updated branches may be copied and re-imported back into the larger mind map.
The mind map may be viewed in either a layout view or an HTML code view. The tabs to toggle between those views are at the bottom left of the work space.
To save the file, select File > Save. It gets stored as a .mm file. (An automatic-save feature helps protect changes to the work.) Remembering the .mm file extension is helpful if you ever need to do a search among many folders and files for this particular file type.
For more information
- SourceForge’s FreeMind documentation (wiki, PDFs, video tutorials, books, and resources)
- Wikipedia: Mind map
- Mind-mapping.org
Next in this series: Working in FreeMind


