–by Sharon Schroll
–by Sharon Schroll
–by Dr. Cassandra Olds–Livestock & Veterinary Entomology
Mosquito larvae develop in standing bodies of water and they don’t need a lot of water to thrive. Female mosquitoes mate shortly after emerging from the water (Figure 1),

after blood feeding they will lay a clutch of eggs on the water’s surface. Mosquito larvae go through three stages, called instars. Each instar gets sequentially bigger before finally turning into the pupal stage. From the pupa, an adult emerges leaving the aquatic environment for the air. While female mosquitoes feed on blood, male mosquitoes feed on plant nectar and are important pollinators. Look around your house for any standing bodies of water, they need not be large! Common mosquito breeding habitats include flower pot bases, watering cans, abandoned swimming pools, used car tires and even holes in trees! Animal watering troughs can be a prime mosquito development site (Figure 2); in large stock tanks, adding fish to eat the larvae can be a solution.

–by Sharon Schroll
Q. What do you get if you throw butter?
A. A butterfly!
–by Anthony Zukoff — Southwest Research and Extension Center
The Insect Diagnostics Program is currently accepting identification requests of digital images using this Online Identification Request Form. Providing clear photos and filling out as much information as possible in the form will help our specialists make accurate determinations and aid in providing more information about the specimen as well as appropriate control recommendations if applicable. Before submitting your form along with photos, here are a few tips for photographing specimens you would like to be identified. https://kstate.qualtrics.com/jfe/form/SV_cLVJsjX5Sy6kjOu
When possible, three images should be submitted. For most arthropods an image of the top (dorsal) of the animal is most crucial; many insects can be identified with this image alone.
Some require other views:
• For most larvae (caterpillars, grubs, maggots) side and bottom (ventral) views are important as well as the head capsule.
• Beetles should be shown with top, bottom, and head (front) views.
• Butterflies and moths should have clear views of wings both above and below.
• Spiders should have top (body) and front (head) views with a visible arrangement of their eyes.
Fill the frame
Aim to get as close to the subject as possible while still ensuring that it is in focus. Cropping a photo afterwards can be an acceptable way of enlarging your subject depending on the camera you are using.
In general, specimens that are less than 5 mm (1/4 inch) are too small to be identified from images using common digital equipment even if zooming in or cropping. Use judgment on specimens that are small but larger than 5 mm.
Lighting
Be sure the subject is well lit. Avoid casting a shadow over it as you take the photo. Good lighting is essential for observing true coloration and other important physical aspects of an insect. Good lighting will also help to get the subject in focus more easily.
Focus
Blurry or out of focus, subjects usually cannot be identified with certainty. Active specimens can be slowed down by placing them in a freezer or refrigerator for a short time before taking pictures. This will reduce the chances of capturing a blurry photo of the specimen due to movement.
Living Subjects
Pictures of live specimens are preferable. Many caterpillars and soft-bodied insects lose their natural color or become dark when they die. Additionally, identification manuals use color patterns to help distinguish different species, colors on adult specimens can fade when they die.
Responses will be transmitted using the contact info you provide on the form. One to five business days may be required to make an identification. Depending on time of the year and complexity of the problem, more time may be needed. Please visit the Insect Diagnostics website for more information. https://entomology.k-state.edu/extension/diagnostician/
–by Raymond Cloyd — Horticultural Entomology
Q: What do moths study In school?
A: Mothematics
–by Cassandra Olds — Livestock and Veterinary Entomology
Encountering ticks is common during outdoor adventures here in Kansas! Many old wives’ tales exist around the best way to remove a tick including burning them, smothering them in petroleum jelly or painting them with nail polish. Here we give you the safest and best way to remove ticks!
Ticks that have not attached to your skin pose no risk, just remove the tick and dispose of it by wrapping it in paper towel and flushing down the toilet or placing it in a sealed plastic bag in the trash. Once you notice a tick that is attached to your skin, remove it as soon as possible. The sooner you remove the tick, the lower your risk of contracting a tick-borne illness. There are many tools available for purchase online, but your fingers or a pair of tweezers work just as well. Using your tweezers (or your thumb and index finger) grab the tick as close to the skin as possible. Pull away from the skin with constant pressure avoiding repeated jerks, twists and pulls. Once the tick is removed, wash the area with soap and water or apply topical disinfectant. Put the removed tick in some rubbing alcohol or in a Ziploc bag placed in the freezer to kill it. We recommend keeping the tick specimen for a few weeks until you are sure that you have not contracted a tick-borne pathogen. If you begin to feel unwell (flu-like symptoms) you can take the tick with you to the doctor for proper identification and if need be, testing. Make a note of when and where the tick was found. Fun fact, sometimes when you remove a tick there is a clear/white hard substance on the tick mouthpart. People sometimes think this is their skin, in fact this is the tick cement cone! This cone is made up of proteins secreted from the tick salivary gland and is there to anchor the tick into the bite site.
Keep the tick in the freezer or some rubbing alcohol for 2 weeks.
–by Raymond Cloyd — Horticultural Entomology
We are seeing damage on elm, Ulmus spp., trees caused by larvae of the European elm flea weevil, Orchestes alni. The larvae are approximately 4 mm (0.16 inches) in length, cream-colored, legless, wrinkled in appearance (Figures 1 and 2)

Figure 1. European elm flea weevil larva (Raymond Cloyd, KSU)

Figure 2. Close-up of European elm flea weevil larva (Raymond Cloyd, KSU)
and located in leaf mines. Adults, which will be present later in the growing season, are 3 mm (0.11 inches) long, red-brown, with black spots or markings on the abdomen (Figure 3).

Figure 3. Adult European elm flea weevil (Raymond Cloyd, KSU)
Their chewing mouthparts are located on the end of a snout-shaped structure that protrudes from the head. The hind legs are thickened and enlarged, which allows the adults to jump when disturbed. Adults are initially active
in May, and after mating, females lay eggs in the large mid-veins of new leaves. Larvae emerge (eclose) from eggs and tunnel through the leaf as they feed, creating serpentine-like mines that enlarge as larvae mature (Figure 4).
Figure 4. Serpentine mines created by European elm flea weevil larvae (Raymond Cloyd, KSU)
). Larvae eventually transition into a pupal stage, and then adults emerge (eclose) from May through June. Adults primarily feed on leaf undersides creating small holes on young leaves (Figure 5).

Figure 5. European elm flea weevil adult feeding damage (Raymond Cloyd, KSU)
Feeding damage caused by larvae and adults will not kill an elm tree; however, extensive feeding damage may ruin the aesthetic appearance. Adults overwinter under loose bark and in leaf litter located under previously infested elm trees. There is one generation per year in Kansas. Nearly all elm species are susceptible to feeding by the European elm flea weevil; especially Siberian elms (Ulmus pumila) and certain elm hybrids with Asian parentage.
–by Dr. Raymond Cloyd — Horticultural Entomology
Q: What kind of car does a bug drive?
A: VW beetle
–by Dr. Raymond Cloyd — Horticultural Entomology
Vanhoutte spirea, Spiraea x vanhouttei, plants are blooming (Figure 1), which means the first generation of pine needle scale, Chionaspis pinifoliae, nymphs (crawlers) are active and you need to “take action” now to prevent an infestation on pine trees or shrubs.
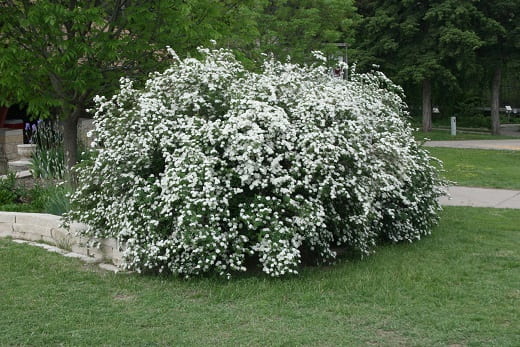
Figure 1. Vanhoutte spirea, Spiraea x vanhouttei, in full-bloom (Raymond Cloyd, KSU)
Biology
Pine needle scale females are approximately 1/8 inch (3.2 mm) long and white with an orange portion that tapers on one end (Figures 2 and 3). Males are 1/25 inch (1.0 mm) long and white with a rectangular covering. Males develop into winged individuals that mate with females and then die. Mated females produce a white, waxy covering, which provides protection from exposure to insecticide spray applications. Females lay (oviposit) red eggs underneath the protective covering and then die. Each female pine needle scale can produce up to 100 eggs.

Figure 2. Pine needle scale females on pine needles (Raymond Cloyd, KSU)
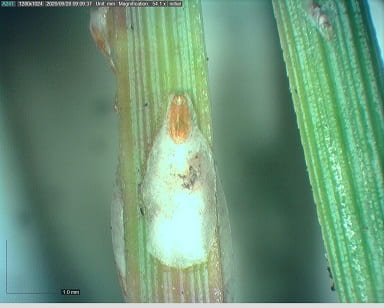
Figure 3. Close-up of pine needle scale female (Raymond Cloyd, KSU)
Red nymphs (crawlers) emerge (eclose) from the eggs and crawl out from under the dead female covering. First generation nymphs emerge over a two to three week period in spring and feed on the current or previous year’s pine needle growth. Second generation nymphs of pine needle scale emerge in summer. First-instar nymphs are flat and red, and after molting, second-instar nymphs are yellow to light-orange (Figure 4). After six to eight weeks, pine needle nymphs become mature adults. Pine needle scale nymphs may be dispersed by wind or carried by birds to new locations where the nymphs can infest other pine trees. In addition, pine needle scale nymphs may move onto branches of adjacent trees that are touching. Pine needle scale overwinters as red eggs underneath the covering of dead females. There are two generations per year in Kansas.
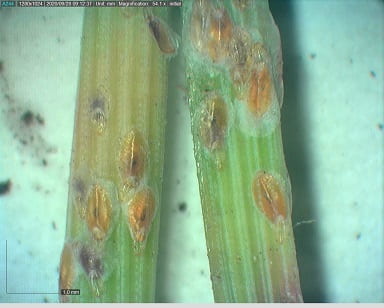
Figure 4. Pine needle scale nymphs (Raymond Cloyd, KSU)
Damage
Pine needle scales withdraw plant fluids from the inner tissues or mesophyll layer of pine needles using their piercing-sucking mouthparts. Feeding can cause pine needles to turn yellow and fall from trees. Pine needle scale infestations typically start on the lower branches. Pine needle scale feeding can reduce the growth and vigor of pine trees or shrubs in landscapes. Heavy infestations of mature pine needle scale appear as white flecks on needles (Figure 5). Since the pine needle scale is a hard or armored scale there is no honeydew, which is a clear, sticky liquid produced by soft scales.
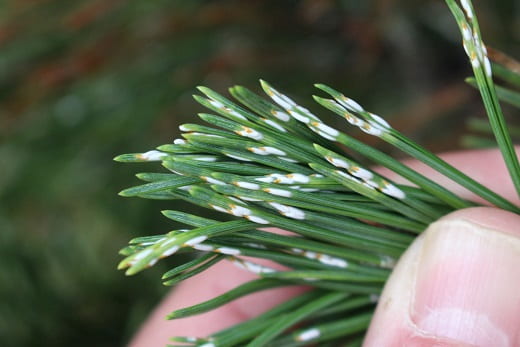
Figure 5. Pine needle scales feeding on needles (Raymond Cloyd, KSU)
Management
Scout pine trees and shrubs weekly in spring to detect the presence of pine needle scale red nymphs. Double-sided sticky tape wrapped around branches captures red nymphs, which will help time insecticide applications or high-pressure water sprays. Check the tape weekly from spring through summer using a 10- to 16-power hand lens to look for the red nymphs. You can also attach a white sheet of paper to a clipboard and place under a branch that is shaken. Any red nymphs dislodged from the shaken branch may be seen crawling on the paper.
Branches heavily infested with pine needle scale should be pruned out and removed from the area. In addition, pine trees or shrubs in landscapes that are heavily infested with pine needle scale should be cut at the base, just above the soil line, and removed from the area.
High pressure water sprays can be used to dislodge (remove) the red nymphs from pine trees and shrubs, and are less harmful to beneficial insects. Pine needle scale nymphs do not have a waxy, protective covering, so they are easier to kill with contact insecticides. Contact insecticides such as horticultural oils (mineral-based) should be applied when the nymphs are active in spring and summer, which will help reduce pine needle scale infestations later in the growing season. Insecticide applications targeting the first-generation of nymphs should be made when Vanhoutte spirea, Spiraea x vanhouttei, plants are in flower…right now! Insecticide applications and high pressure water sprays should be conducted every seven to 10 days to kill or dislodge the nymphs that emerge from underneath the dead female covering over a two to three week period. Needles and branches should be thoroughly covered with insecticide applications or high pressure water sprays to effectively suppress pine needle scale populations. Pine needle scale is a hard or armored scale, therefore, systemic insecticides applied to the soil will not protect pine trees and shrubs from infestations.
For more information on pine needle scale, consult the following extension publication:
Cloyd, R. A. April 2021. Pine needle scale: insect pest of pine trees (MF3563)
https://www.bookstore.ksre.ksu.edu/pubs/MF3563.pdf
|