Kansas State University

search

K-State Turf and Landscape Blog

Category: Landscape management

Mulch Rings Around Trees in Turfgrass

By Cody Domenghini, Assistant Professor, Landscape Management

A mulch ring is a circular border surrounding a tree commonly made of organic material such as wood chips. Trees planted in turfgrass should have mulch rings installed around them for a couple of reasons. Creating a mulch boundary around trees prevents lawn maintenance equipment such as string trimmers and mowers from getting too close to the trunk and causing damage. When grass is allowed to grow right up to the trunk the tree roots are in competition with the turfgrass for water and nutrients. A mulch layer over the root zone eliminates this conflict.

Ideally, trees should be planted in a landscape bed rather than in the middle of a lawn. However, when grown in a lawn, trees should have a mulch ring at least three feet in diameter for every inch of tree trunk caliper surrounding them.

Measuring tree trunk caliper of a young tree planted in turfgrass.

The mulch should resemble the shape of a donut with the center of the ring creating a 4-6” gap between the trunk of the tree and the start of the mulch. The space between the tree trunk and the mulch ring allows oxygen and water to easily reach the roots and prevents the risk of rot at the base of the trunk.

Example of a donut shaped mulch ring with the mulch not touching the tree trunk.
Volcano mulching

Avoid the common mistake of “volcano mulching”. Layer the mulch 2-4” deep. Throughout the year the mulch will breakdown, contributing organic matter to the soil and improving soil quality. Mulch should be reapplied annually. When adding a tree ring to an already established tree in a lawn, carefully remove the sod from the top few inches to not damage any tree roots.

Adding a mulch ring to an established tree.

Mulch rings for large trees should be large enough to create a barrier between the edge of the turfgrass and the trunk of the tree to prevent damage to the trunk from mowing equipment, but do not necessarily have to follow the size guidelines advised for younger trees. Adding tree rings and mulch around trees is best done in the spring, but can be completed anytime of the year.

Below is a link to an extension article discussing the proper way to mulch trees.

https://www.johnson.k-state.edu/lawn-garden/agent-articles/trees-shrubs/how-to-mulch-trees.html

Pushing Snow

Many of you are busy “pushing snow” with the recent cold weather, and there will likely be more snow to push in the next couple of months. Please take a few minutes to train your staff on protecting ornamental plants when clearing hard surfaces like parking lots.

While clearing the lot, driveway, or sidewalk is the most critical objective, “do no harm” should also be a goal. Far too many plants are crushed by the push and weight of snow in winter months. Sometimes, the mystery summer problem is actually a clear winter problem.

There is a tendency to pile snow on top of green spaces in parking lots. However, plants in those spaces continue to need to photosynthesize (evergreens) and exchange gases and are likely to die or suffer severe dieback if the cold weather persists and the snow takes a significant time to melt. Piling snow in planting areas can also contribute to soil compaction and root decline, causing problems later in the growing season.

De-icing chemicals are often mixed into snow that is pushed into landscape settings. As the snow melts, it dumps salt into the planting area, damaging shoots and roots for the long term. To minimize the landscape impacts of clearing snow, consider alternative de-icing salts like calcium chloride and calcium magnesium acetate and follow the label instructions when possible. Sand can also help provide traction.

With your staff, practice identifying an appropriate place to pile snow that isn’t in landscape areas, offers a place to collect runoff, and won’t result in slush that can splash onto plants. When possible, make these decisions before snow is on the ground—snow can cover a lot of detail and make it easy to lose track of the areas that need to be preserved.

Study each site individually and develop a plan for human, pet, and plant safety when winter storms hit to avoid problems in the future and establish trust with your clients.

Understanding Herbicide Interactions

By Dani McFadden, Graduate Research Assistant, Horticulture and Natural Resources

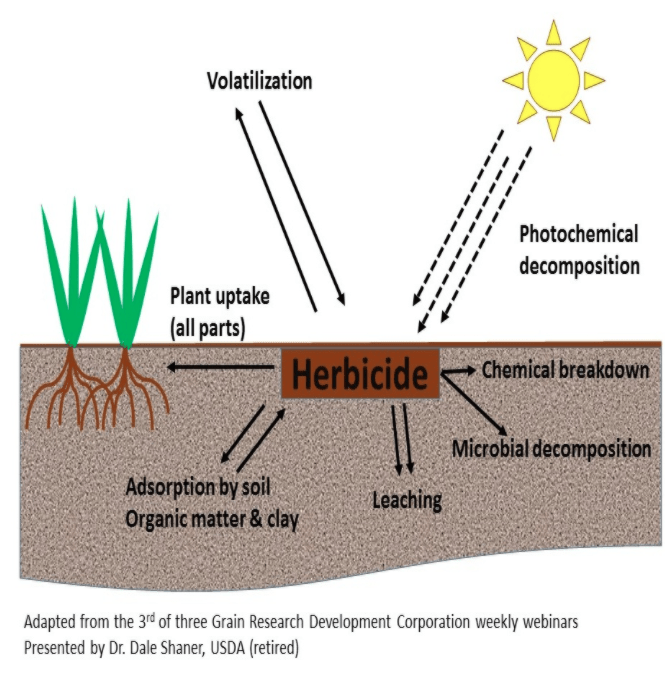
It is that time of year when winter annuals and cool-season broadleaf weeds start emerging. Understanding how your herbicide is interacting in the soil and within the plant is important for effective weed control. Let’s take a shallow dive into the world of herbicide interactions so you’ll better understand the process a plant undergoes after an application.

Mode of action explains the entire sequence of events that happens from herbicide application to plant death, this includes the uptake, translocation and metabolism. This term is often confused with mechanism of action or site of action, which is the specific location at the cellular level where the disruption occurs. Contact herbicides (ex. diquat) injure the plant wherever they touch the plant, and often work quickly. We find that contact herbicides are more effective on small annual weeds compared to perennial weeds. Systemic herbicides (ex. glyphosate, 2,4-D) must be absorbed by the plant and then move throughout. In contrast to contact herbicides, systemic herbicides are very effective on perennial weeds. Since systemic herbicides are able to translocate to different parts of the plant, they are able to kill perennial weeds at the roots, tubers, and/or rhizomes.

So, how are commonly used herbicides effective against weeds? First, the herbicide needs to effectively contact the plant (more critical for contact herbicides compared to systemic herbicides) and then be absorbed by the plant. The compounds will then move to the site of action, and if there is enough toxicity within the site of action the plant will ultimately die.


Understanding the life cycle and biology of weeds will increase performance of the herbicide. However, there are several factors that can affect the uptake, translocation, and metabolism of the herbicide once it reaches the plant. Plant barriers such as waxy cuticles on the leaf surface or the casparian strip (a band-like wall that blocks the movement of water and solutes in vascular plants) can reduce herbicide uptake. Furthermore, climatic conditions and properties of the herbicide can influence efficacy. Here are some properties of herbicides that will help you understand how it will perform in certain environments at or following application:

  • Water solubility (Kow) is important because it affects behavior in the soil, formulation of an active ingredient, and separation of the herbicide into the plant. If herbicides have a high Kow they will be less soluble in water.
  • Soil adsorption (Koc) focuses on the retention of herbicide compounds and what influences persistence and availability of the herbicide. Many factors affect how herbicides are adsorbed, such as: moisture, clay content and organic matter, and soil pH. The Koc affects the herbicides tendency to bind to soil particles.
  • Volatility and particle drift is the physical drift that occurs during or immediately after application, with smaller droplets being more likely to drift than larger droplets. Furthermore, it is important to note that if the vapor pressure of the herbicide is high, then potential for non-target plant injury increases. Factors increasing volatility after herbicide application include: higher temperatures and increased soil water content. In addition, broadleaf herbicides containing high ester content are more volatile. To reduce volatilization applications can be incorporated into the soil or applied when weather conditions are favorable.

For plant absorption and translocation, herbicides must cross several barriers. It is important to read the herbicide label before use. If a surfactant is recommended, then one should be utilized. A surfactant can aid in decreasing surface tension and increasing absorption.

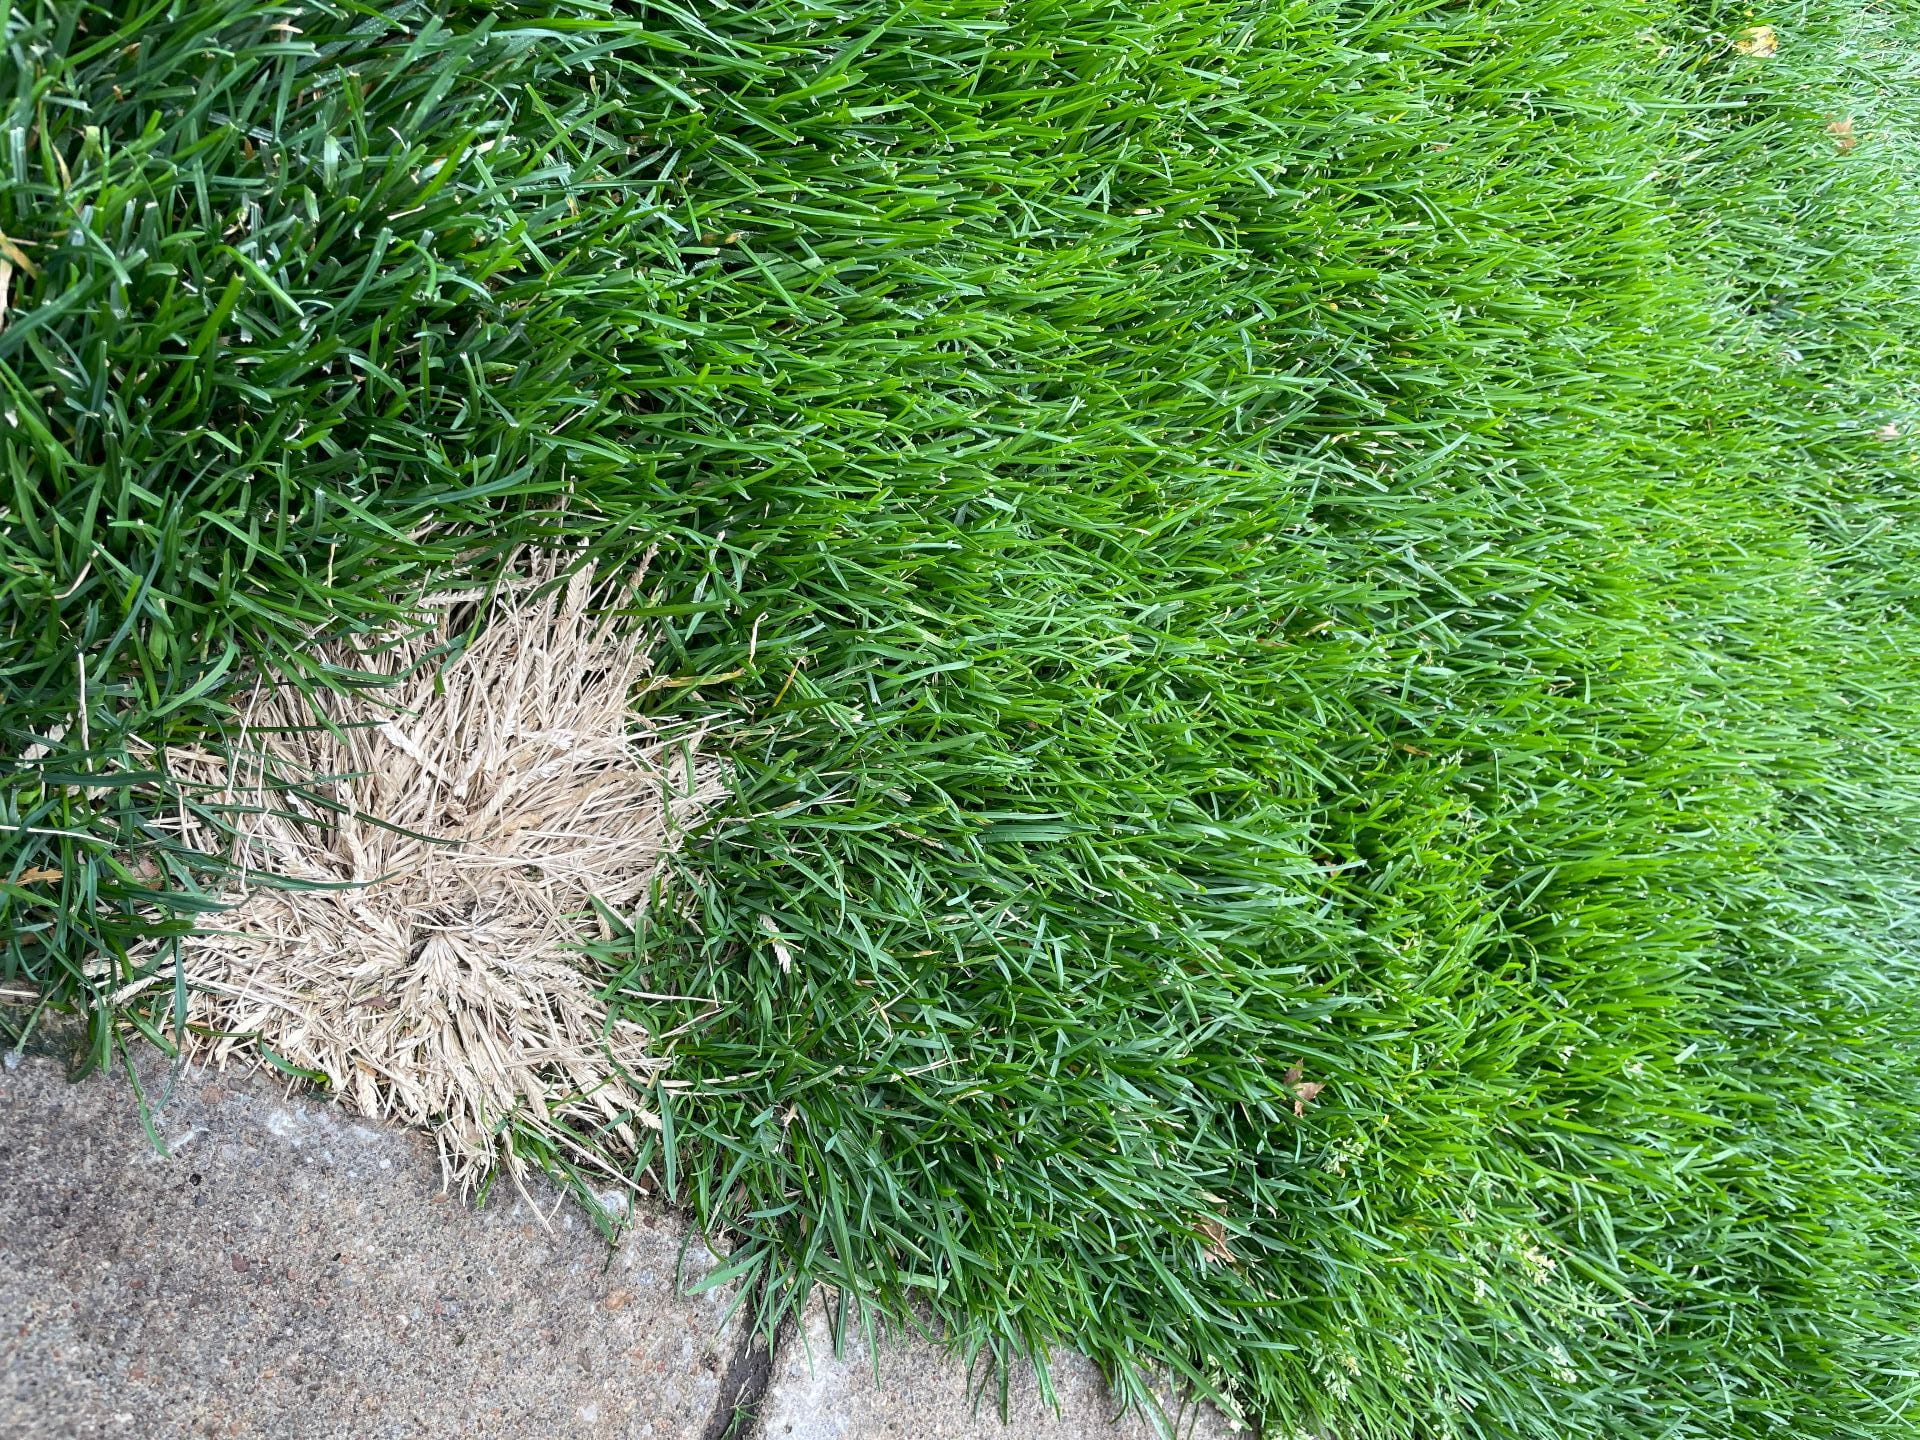
Topramezone app on goosegrass

Having knowledge on: 1) the biology and life cycle of the weed you are controlling; 2) properties of the herbicide you are applying; and 3) environmental conditions and soil factors at your site will aid in effective weed control.

It is imperative to always READ THE LABEL before applying herbicides for the correct rate, turfgrass tolerance, and important instructions for application.


***Mention of trade names or commercial products in this article is solely for identification purposes and does not imply recommendation or endorsement, nor is criticism implied of similar products not mentioned by Kansas State University.***

Rose Rosette Virus Active in Summer 2023

By Judy O’Mara, Director, K-State Plant Disease Diagnostic Lab


Rose rosette is currently showing up in Kansas gardens. This disease is a serious problem in wild multiflora roses but also goes to many common garden roses.
The rose rosette virus is spread from plant to plant by a microscopic eriophyid mite (Phyllocoptes fructiphilus).  It is the only known insect vector of the rose rosette disease. The mite can be wind dispersed or moved around on tools, clothing or infected plant material. Mites can successfully overwinter on the rose plant. The rose rosette virus can also be spread through grafting.

Rose rosette causes a progressive deformity of the rose plant that gets worse over time. It is challenging to identify visually because symptoms vary widely from plant to plant. Some prominent symptoms can include reddish or distorted leaves, stems that are elongated and thickened, a proliferation of shoots (rosette), and excessive thorniness. Plants infected with rose rosette are also more susceptible to winter damage.

An initial symptom of rose rosette might be an elongated stem with reddish leaves that stands out above the normal growth habit of the shrub. Reddish leaves are a tricky symptom because roses put out new flushes of growth throughout the growing season and the new leaves commonly start out red and then green up.

More characteristic for rose rosette virus are symptoms of bunchy growth or a proliferation of shoots. This symptom is referred to as a rosette or witches’ broom.  Some roses have a bunchy growth pattern so keep in mind that this symptom development should look new or different from the established growth habit of the plant.

A striking symptom for rose rosette is excessive thorniness along the stems. These thorns are generally small, green and soft whereas normal thorns tend to be larger, hard and sharp. Infected plants usually have both types of thorns present.

Pruning out symptomatic portions of infected rose plants will not eliminate the disease.

Plants with rose rosette can survive for one to two years but the virus will continue to spread within a planting. It is important to remove infected plants as soon as possible, including the roots. Infected  plants should be placed in trash bags to reduce further spread of the eriophyid mites.

Interspersing roses with non-rose hosts can slow down the spread of the mite and the rose rosette disease. Dead heading roses throughout the growing season will help minimize the habitat of the eriophyid mite. Resistance is not available for commonly grown garden roses. Native roses resistant to rose rosette include: prickly rose (Rosa acicularis ), prairie rose (Rosa arkansana), smooth rose (Rosa blanda), swamp rose (Rosa paulustris), Carolina rose (Rosa carolina), and scotch rose (Rosa spinosissima).

Visual identification of rose rosette virus disease can be challenging. The K-State Plant Disease Diagnostic Lab does offer a PCR test that can confirm the presence of rose rosette virus.  Testing can be expensive but might be worthwhile in locations with large plantings of roses.


K-State Plant Disease Diagnostic Lab

4032 Throckmorton PSC
1712 Claflin Road
Manhattan, KS 66506
clinic@ksu.edu
785-532-6176


Useful references:

Rose Rosette Disease: A Diagnostic Guide. N. Claros, etal. https://apsjournals.apsnet.org/doi/10.1094/PHP-05-22-0047-DG

Rose Rosette Disease. J. Olson, etal.
https://extension.okstate.edu/fact-sheets/rose-rosette-disease.html#management-guidelines-for-rrd

Feeding Damage to Rose Leaves

From the KSU Entomology Newsletter, article by Raymond Cloyd

We have received numerous inquiries regarding insects feeding on the leaves of rose plants. The insects are sawflies and there are at least two species that attack roses this time of year: the rose slug, Endelomyia aethiops, and the bristly rose slug, Cladius difformis. Rose sawflies are the immature or larval stage, which eventually become a black to yellow adult that resemble wasps. Rose sawfly females create openings or slits along the edges of rose leaves with their saw-like egg laying device (ovipositor) in which eggs are inserted. Larvae emerge (eclose) from the eggs and resemble small slugs. Larvae are approximately 1/2 of an inch long when full-grown and yellow-green, with an orange head.

The larvae will fall onto the soil surface to pupate. Rose sawflies overwinter as pupae in earthen cells created by the larvae. There is typically one generation per year in Kansas. Rose sawfly larvae cause damage by feeding on the underside of rose leaves causing the leaves to appear skeletonized.


Small infestations of rose sawflies are best dealt with by removing the larvae by hand and placing into a container of soapy water. A high pressure water spray will quickly dislodge sawfly larvae from rose plants. Once dislodged the larvae will not crawl back onto rose plants. There are contact insecticides containing various active ingredients that are effective in managing populations of sawflies. Sawflies are not caterpillars.

Consequently, the bacterium, Bacillus thuringiensis subsp. kurstaki, which is the active ingredient in various products (e.g. Dipel®) has no activity on sawflies because the insecticide is only effective against caterpillars.

Pesticide Best Management Practices for Commercial Lawn and Ornamental Plant Care

By Frannie Miller and Cheryl Boyer

“The label is the law.” Most pesticide applicators are familiar with this phrase. Yet, pesticides are sometimes used in ways inconsistent with product labels. Examples may include using a product on a site that it is not labeled for, using a rate greater than labeled, using an application method that is not labeled, and many others. Sometimes, pesticides have similar active ingredients but different formulations. Using a formulation not labeled for a particular site is also a misuse. Even though the off-label practice seems harmless at the time, doing so may have unintended consequences, including additional pesticide limitations. The pesticide toxicity and amount of exposure affect the amount of risk to human health. Remember, pesticides are designed to kill certain organisms (insects, weeds, and diseases) and therefore have a degree of toxicity that could cause harm to humans. Label directions are written to minimize risks for homeowners, applicators, bystanders, and the environment. Remember to read, understand and follow the pesticide product label carefully. The following paragraphs discuss some best management practices when making pesticide applications.

First, conduct regular pest scouting to identify issues such as weeds, insects, and diseases, and then assess if the pest pressure justifies treatment. For those pests that are a common problem, develop an integrated pest management (IPM) plan which outlines the non-chemical pest control methods that can be used to help manage these pests. Examples include prevention (sanitation, use of pest-free seeds/transplants), physical barriers (landscape fabric, mulch), mechanical (hand removal, hoeing, plant thinning/trimming), cultural practices (timely watering and fertilization, planting turf varieties to pest pressure), and biological control (promoting beneficial insects). Use pesticides only when pest populations reach economic threshold levels or when conditions favor the development of high populations and then apply the pesticide at the labeled rate. Spot treat if the pest populations are not widely distributed throughout the area. Also, try to select pesticides with low toxicity to humans and other non-target organisms, such as pollinators, pets, birds, etc.

Second, ensure the protection of the environment by calibrating and inspecting application equipment before application. Do not calibrate near ponds, lakes, or other bodies of water, and do not apply to any water body unless the product is labeled for aquatic use. Never clean pesticide application equipment over a mix/load pad that has a drain or where contaminated rinse water can flow into a body of water. Follow spray drift management recommendations/requirements on the product label to help mitigate drift. Examples include not applying when the wind blows> 15 mph or under temperature inversion conditions. Ensure pollinator requirements on the label are followed. These statements are under the “Environmental Hazards” or the “Bee Advisory” box on the label. Avoid using pesticides within the same chemical group or mode of action over an extended period of time to help prevent pesticide resistance. Look at each product’s active ingredient(s) and keep records of what you have used for a specific pest.

Third, follow the label to ensure the safety of applicators, homeowners, handlers, and others. Always keep the product label and Safety Data Sheet (SDS) available for all the products you apply. Always use the label-approved Personal Protective Equipment (PPE). PPE is intended to prevent pesticide exposure to the applicator by creating a barrier between the applicator and the pesticide. Store PPE in a clean and safe place to avoid contamination. Keep pesticide products in the original container and store pesticide products in a safe and secure place that is out of the reach of children.

The turfgrass and ornamental industry spends hundreds of millions of dollars to develop pesticides and the data to prove they can be used safely. Users are responsible for following label directions and handling products in ways that ensure safe use. This is one of the most important steps to take to protect the well-being of our families and communities and ensure access to pesticides in the future.

Beauty and Order – A New Textbook for those in the Landscape Industry (and others)


Author

Randy James is author of the textbook Beauty & Order: 51 Lessons from my life’s work in Landscape Management and success in small business. Randy is a K-State graduate (Horticulture undergraduate; Plant Pathology Master’s degree) who has owned landscape management businesses for many years.  Many of you may have heard Randy speak at the Kansas Turf and Landscape Conference or others.  Randy provides guidance to those interested in owning and managing companies in this industry and others.  It was not written for his benefit, but to assist those in the industry.  Highly recommended!

About the Book

Starting a service business is a work of art. Whether the intention is for it to remain a practice or to be scaled, the creation takes the whole person- left brain, right brain and soul.

What is going on in the mind of a person when the desire to go-it-alone takes hold?

Where do you start? When do you start? How do you start?

What obstacles and struggles can one expect?

In a conversational style, the author shares his small business journey in landscape contracting in a simple and vulnerable way. The hope being it might spark the next entrepreneur to dream of a way to meet both their personal needs and the market place.

Or it may inspire an existing small business owner to take their business to another level.

Either way, the world will be better for what they create.

Several sites on which you can access:

Blurb

Barnes and Noble

Amazon